图片太多了怎么办?LeePoet一站式智能整理方案
💡 LeePoet技术理念:复杂的科技,应该以最简单的方式服务每个普通人。
你是否也曾在数千张照片中翻找一张重要合影?是否因为图片太多而放弃整理? 本文是数字时代每个人的“图片救星”。无论你是拥有上万张照片的摄影爱好者,还是被工作图片淹没的职场人,LeePoet将用AI技术为你提供从简单到专业的全系列解决方案。
从人物识别到内容分类,Python自动化搞定图片管理,每个人手机里几千张照片的普遍现象,手动整理的痛苦:耗时、低效、容易遗漏,LeePoet的解决方案理念:技术让生活更简单。”隐私保护+内容管理,一键分类敏感图片”,多层级风险评估。
包含开箱即用的Python脚本、详细配置教程和常见问题解决方案。LeePoet用实际案例证明,技术不应该高高在上,而要真正服务于生活。
UBUNTU创建虚拟环境操作
1.创建虚拟环境
# 进入你的项目文件夹
cd /path/to/your/project

# 创建虚拟环境(会在当前文件夹创建 venv 目录)
python3 -m venv myenv
2.激活虚拟环境
source myenv/bin/activate
3.安装依赖
python -m pip install opencv-python
如果要使用增强版本,还需要安装:
python -m pip install torch ultralytics
4.基本完成。
初级检测:
创建一个名为 extract_people_images.py的文件完整代码:
import os
import shutil
import cv2
from pathlib import Path

def detect_people_in_image(image_path, face_cascade=None):
    """
    检测图片中是否包含人物
    """
    if face_cascade is None:
        face_cascade = cv2.CascadeClassifier(cv2.data.haarcascades + 'haarcascade_frontalface_default.xml')

    try:
        img = cv2.imread(image_path)
        if img is None:
            return False

        gray = cv2.cvtColor(img, cv2.COLOR_BGR2GRAY)

        faces = face_cascade.detectMultiScale(
            gray,
            scaleFactor=1.1,
            minNeighbors=5,
            minSize=(30, 30)
        )

        return len(faces) > 0

    except Exception as e:
        print(f"处理图片 {image_path} 时出错: {e}")
        return False

def extract_images_with_people(source_dir, target_dir):
    """
    从源文件夹提取带人物的图片到目标文件夹
    """
    supported_formats = ['.jpg', '.jpeg', '.png', '.bmp', '.tiff', '.webp']

    # 创建目标文件夹
    Path(target_dir).mkdir(parents=True, exist_ok=True)

    # 加载人脸检测器
    face_cascade = cv2.CascadeClassifier(cv2.data.haarcascades + 'haarcascade_frontalface_default.xml')

    # 统计信息
    total_images = 0
    images_with_people = 0

    print("开始扫描图片...")

    for filename in os.listdir(source_dir):
        file_path = os.path.join(source_dir, filename)

        # 检查文件格式
        if os.path.isfile(file_path) and any(filename.lower().endswith(fmt) for fmt in supported_formats):
            total_images += 1
            print(f"处理第 {total_images} 张图片: {filename}")

            # 检测是否包含人物
            if detect_people_in_image(file_path, face_cascade):
                images_with_people += 1

                # 构建目标路径
                target_path = os.path.join(target_dir, filename)

                # 处理重名文件
                counter = 1
                while os.path.exists(target_path):
                    name, ext = os.path.splitext(filename)
                    target_path = os.path.join(target_dir, f"{name}_{counter}{ext}")
                    counter += 1

                # 复制文件
                shutil.copy2(file_path, target_path)
                print(f"✓ 检测到人物: {filename}")
            else:
                print(f"✗ 未检测到人物: {filename}")

    print("\n" + "="*50)
    print("处理完成!")
    print(f"总共处理图片: {total_images}张")
    print(f"检测到包含人物的图片: {images_with_people}张")
    print(f"图片已保存到: {target_dir}")

def main():
    # 设置路径
    current_dir = os.getcwd()
    target_dir = os.path.join(current_dir, "images_with_people")

    print(f"当前文件夹: {current_dir}")
    print(f"目标文件夹: {target_dir}")
    print("-" * 50)

    # 执行提取
    extract_images_with_people(current_dir, target_dir)

if __name__ == "__main__":
    main()
5. 运行脚本
python extract_people_images.py
6. 退出虚拟环境
完成后,可以退出虚拟环境:
其它说明:安装所需库(上面装完了可以不看这)
# 升级pip(可选)
python -m pip install --upgrade pip

# 安装OpenCV(基础版本)
python -m pip install opencv-python

# 或者安装增强版本所需的库
python -m pip install opencv-python torch ultralytics
创建 requirements.txt 文件(可选)
你可以创建一个依赖文件,方便以后重新安装:
# 生成requirements.txt
python -m pip freeze requirements.txt
requirements.txt 内容示例:
opencv-python==4.8.1.78
numpy==1.24.3
以后重新安装依赖:
python -m pip install -r requirements.txt
完整的项目结构建议
your_project/
├── venv/                    # 虚拟环境(不要提交到版本控制)
├── extract_people_images.py # 主程序
├── requirements.txt         # 依赖列表
└── images_with_people/      # 输出文件夹(程序自动创建)
库装不上的其它操作
python -m pip install -r requirements.txt -i https://pypi.tuna.tsinghua.edu.cn/simple –verbose
中级检测:
正常激活虚拟环境
cd myenv  #即虚拟环境目录
source myenv/bin/activate   # 进入虚拟环境(如果还没激活)
pip install opencv-python    # 确保已安装所需库
安装依赖的完整步骤
# 1. 激活虚拟环境
source myenv/bin/activate

# 2. 安装依赖(如果网络慢可以使用清华镜像)
python -m pip install torch torchvision ultralytics opencv-python

# 或者使用国内镜像加速安装
python -m pip install -i https://pypi.tuna.tsinghua.edu.cn/simple torch torchvision ultralytics opencv-python

# 直接使用python命令运行,不需要执行权限
python extract_people_images.py

# 给脚本执行权限:
chmod +x extract_people_images.py
##
一、增强检测人物图片:
使用YOLOv8模型进行更准确的人物检测,增强版人物图片检测
模型说明
yolov8n.pt:最小最快,适合快速检测yolov8s.pt:平衡速度和精度yolov8m.pt:中等精度yolov8l.pt:高精度yolov8x.pt:最高精度,最慢
特性
更准确的人物检测 :YOLO可以检测各种姿势、大小的人物可调置信度 :根据需求调整检测敏感度检测预览 :可选保存带检测框的图片详细统计 :显示检测数量、置信度、处理时间等错误处理 :完善的异常处理,不会因为单张图片失败而停止进度显示 :实时显示处理进度
这个增强版本比基础版本准确得多,特别是对于侧面、远处、遮挡的人物检测效果更好!
完整的Python代码
#!/usr/bin/env python3
"""
增强版人物图片检测程序
使用YOLOv8模型进行更准确的人物检测
"""

import os
import shutil
import argparse
from pathlib import Path
import time

def setup_environment():
    """检查并导入所需的库"""
    try:
        from ultralytics import YOLO
        import cv2
        return YOLO, cv2
    except ImportError as e:
        print("错误: 缺少必要的库")
        print("请安装以下依赖:")
        print("pip install torch torchvision ultralytics opencv-python")
        print("\n如果安装缓慢,可以使用清华镜像:")
        print("pip install -i https://pypi.tuna.tsinghua.edu.cn/simple torch torchvision ultralytics opencv-python")
        return None, None

def extract_images_with_people_enhanced(source_dir, target_dir, confidence_threshold=0.3,
                                      model_size='yolov8n.pt', device='cpu',
                                      save_detection_preview=False):
    """
    使用YOLO模型检测并提取包含人物的图片

    参数:
    source_dir: 源文件夹路径
    target_dir: 目标文件夹路径
    confidence_threshold: 置信度阈值(0.0-1.0),值越小检测越敏感
    model_size: 模型大小 ('yolov8n.pt', 'yolov8s.pt', 'yolov8m.pt', 'yolov8l.pt', 'yolov8x.pt')
    device: 运行设备 ('cpu' 或 'cuda')
    save_detection_preview: 是否保存带检测框的预览图
    """

    # 检查库是否可用
    YOLO, cv2 = setup_environment()
    if YOLO is None:
        return

    # 创建目标文件夹
    Path(target_dir).mkdir(parents=True, exist_ok=True)

    # 如果启用预览,创建预览文件夹
    preview_dir = None
    if save_detection_preview:
        preview_dir = os.path.join(target_dir, "detection_previews")
        Path(preview_dir).mkdir(parents=True, exist_ok=True)

    # 支持的图片格式
    supported_formats = ['.jpg', '.jpeg', '.png', '.bmp', '.tiff', '.webp', '.JPG', '.JPEG', '.PNG']

    print("=" * 60)
    print("增强版人物图片检测程序")
    print("=" * 60)
    print(f"源文件夹: {source_dir}")
    print(f"目标文件夹: {target_dir}")
    print(f"模型: {model_size}")
    print(f"置信度阈值: {confidence_threshold}")
    print(f"设备: {device}")
    print(f"保存检测预览: {save_detection_preview}")
    print("-" * 60)

    try:
        # 加载YOLO模型(会自动下载如果不存在)
        print("正在加载YOLO模型...")
        start_time = time.time()
        model = YOLO(model_size)
        load_time = time.time() - start_time
        print(f"✓ 模型加载完成,耗时: {load_time:.2f}秒")

    except Exception as e:
        print(f"✗ 模型加载失败: {e}")
        print("请检查网络连接或手动下载模型")
        return

    # 统计信息
    total_images = 0
    images_with_people = 0
    processed_files = []
    detection_times = []

    print("\n开始扫描图片...")

    # 获取所有图片文件
    image_files = []
    for filename in os.listdir(source_dir):
        file_path = os.path.join(source_dir, filename)
        if os.path.isfile(file_path) and any(filename.lower().endswith(fmt) for fmt in supported_formats):
            image_files.append(filename)

    total_files = len(image_files)
    print(f"找到 {total_files} 张待处理图片")

    # 处理每张图片
    for i, filename in enumerate(image_files, 1):
        file_path = os.path.join(source_dir, filename)

        print(f"\n[{i}/{total_files}] 处理: {filename}")
        total_images += 1

        try:
            # 记录开始时间
            start_time = time.time()

            # 使用YOLO进行检测
            results = model(file_path, conf=confidence_threshold, device=device, verbose=False)
            detection_time = time.time() - start_time
            detection_times.append(detection_time)

            # 检查是否检测到人物(YOLO中person类的ID是0)
            has_people = False
            people_count = 0
            max_confidence = 0.0

            for result in results:
                if result.boxes is not None and len(result.boxes) > 0:
                    for box in result.boxes:
                        class_id = int(box.cls)
                        confidence = float(box.conf)

                        # class_id 0 对应 'person'
                        if class_id == 0:
                            has_people = True
                            people_count += 1
                            max_confidence = max(max_confidence, confidence)

            if has_people:
                images_with_people += 1

                # 构建目标文件路径
                target_path = os.path.join(target_dir, filename)

                # 处理重名文件
                counter = 1
                base_target_path = target_path
                while os.path.exists(target_path):
                    name, ext = os.path.splitext(filename)
                    target_path = os.path.join(target_dir, f"{name}_{counter}{ext}")
                    counter += 1

                # 复制原图到目标文件夹
                shutil.copy2(file_path, target_path)

                # 如果启用预览,保存带检测框的图片
                if save_detection_preview and has_people:
                    try:
                        # 绘制检测结果
                        plotted_image = results[0].plot()
                        preview_filename = f"preview_{os.path.splitext(filename)[0]}.jpg"
                        preview_path = os.path.join(preview_dir, preview_filename)
                        cv2.imwrite(preview_path, plotted_image)
                    except Exception as e:
                        print(f"  警告: 无法保存检测预览图: {e}")

                print(f"  ✓ 检测到 {people_count} 个人物 (最高置信度: {max_confidence:.3f})")
                print(f"  ✓ 检测时间: {detection_time:.2f}秒")
                print(f"  ✓ 已复制到: {os.path.basename(target_path)}")

                processed_files.append({
                    'filename': filename,
                    'people_count': people_count,
                    'max_confidence': max_confidence,
                    'detection_time': detection_time
                })

            else:
                print(f"  ✗ 未检测到人物 (检测时间: {detection_time:.2f}秒)")

        except Exception as e:
            print(f"  ✗ 处理图片时出错: {e}")
            continue

    # 输出统计信息
    print("\n" + "=" * 60)
    print("处理完成!")
    print("=" * 60)

    if total_images > 0:
        print(f"总共处理图片: {total_images}张")
        print(f"检测到包含人物的图片: {images_with_people}张")
        print(f"检测率: {(images_with_people/total_images*100):.1f}%")

        if detection_times:
            avg_detection_time = sum(detection_times) / len(detection_times)
            print(f"平均检测时间: {avg_detection_time:.2f}秒/张")
            print(f"总检测时间: {sum(detection_times):.2f}秒")

        if images_with_people > 0:
            print(f"\n包含人物的图片已保存到: {target_dir}")
            if save_detection_preview:
                print(f"检测预览图已保存到: {preview_dir}")

            # 显示检测到最多人物的前几张图片
            if processed_files:
                processed_files.sort(key=lambda x: x['people_count'], reverse=True)
                print(f"\n检测结果最好的图片:")
                for i, file_info in enumerate(processed_files[:3]):
                    print(f"  {i+1}. {file_info['filename']} - {file_info['people_count']}人 "
                          f"(置信度: {file_info['max_confidence']:.3f})")
    else:
        print("未找到任何可处理的图片文件")

def main():
    """主函数"""
    parser = argparse.ArgumentParser(description='增强版人物图片检测程序')
    parser.add_argument('--source', '-s', default='.',
                       help='源文件夹路径 (默认: 当前文件夹)')
    parser.add_argument('--target', '-t', default='images_with_people',
                       help='目标文件夹路径 (默认: images_with_people)')
    parser.add_argument('--confidence', '-c', type=float, default=0.3,
                       help='检测置信度阈值 (0.0-1.0, 默认: 0.3)')
    parser.add_argument('--model', '-m', default='yolov8n.pt',
                       choices=['yolov8n.pt', 'yolov8s.pt', 'yolov8m.pt', 'yolov8l.pt', 'yolov8x.pt'],
                       help='YOLO模型大小 (默认: yolov8n.pt)')
    parser.add_argument('--device', '-d', default='cpu',
                       choices=['cpu', 'cuda'],
                       help='运行设备 (默认: cpu)')
    parser.add_argument('--preview', '-p', action='store_true',
                       help='保存带检测框的预览图')

    args = parser.parse_args()

    # 检查源文件夹是否存在
    if not os.path.exists(args.source):
        print(f"错误: 源文件夹 '{args.source}' 不存在")
        return

    # 运行检测程序
    extract_images_with_people_enhanced(
        source_dir=args.source,
        target_dir=args.target,
        confidence_threshold=args.confidence,
        model_size=args.model,
        device=args.device,
        save_detection_preview=args.preview
    )

# 简化版本函数(不需要命令行参数)
def simple_extract():
    """简化版本,使用默认参数"""
    source_dir = os.getcwd()  # 当前文件夹
    target_dir = os.path.join(source_dir, "images_with_people")

    print("使用简化模式运行...")
    extract_images_with_people_enhanced(source_dir, target_dir)

if __name__ == "__main__":
    # 如果没有命令行参数,使用简化版本
    import sys
    if len(sys.argv) == 1:
        simple_extract()
    else:
        main()
步骤1:保存文件
在nano编辑器中:
按 Ctrl+X退出
按 Y确认保存
按 Enter确认文件名
步骤2:运行程序
python extract_people_images_enhanced_copy.py
方法2:使用命令行参数
# 基本使用
python extract_people_images_enhanced_copy.py --source /path/to/images --target ./output

# 调整检测敏感度(值越小越敏感)
python extract_people_images_enhanced_copy.py --confidence 0.2

# 使用更大的模型(更准确但更慢)
python extract_people_images_enhanced_copy.py --model yolov8s.pt

# 保存检测预览图
python extract_people_images_enhanced_copy.py --preview

# 使用GPU加速(如果有NVIDIA显卡)
python extract_people_images_enhanced_copy.py --device cuda

# 查看所有选项
python extract_people_images_enhanced_copy.py --help
模
如果还是有问题,使用这个简单版本:
# 先删除所有有问题的文件
rm -f *.py

# 创建简单版本
cat > simple_detection.py << 'EOF'
import os
import shutil
import cv2
from pathlib import Path

def detect_people():
    print("开始检测人物图片...")

    # 检查OpenCV
    try:
        face_cascade = cv2.CascadeClassifier(cv2.data.haarcascades + 'haarcascade_frontalface_default.xml')
    except:
        print("请先安装OpenCV: pip install opencv-python")
        return

    # 创建目标文件夹
    target_dir = "images_with_people"
    Path(target_dir).mkdir(exist_ok=True)

    # 支持的图片格式
    formats = ['.jpg', '.jpeg', '.png']
    count = 0

    for filename in os.listdir('.'):
        if any(filename.lower().endswith(fmt) for fmt in formats):
            print(f"处理: {filename}")
            img = cv2.imread(filename)
            if img is not None:
                gray = cv2.cvtColor(img, cv2.COLOR_BGR2GRAY)
                faces = face_cascade.detectMultiScale(gray, 1.1, 5)
                if len(faces) > 0:
                    shutil.copy2(filename, os.path.join(target_dir, filename))
                    print(f"✓ 检测到人物")
                    count += 1
                else:
                    print(f"✗ 未检测到人物")

    print(f"\n完成! 找到 {count} 张包含人物的图片")

if __name__ == "__main__":
    detect_people()
EOF

# 运行简单版本
python simple_detection.py
请按照步骤1-4操作,应该能解决问题!
二、增强检测人物图片(自定义文件夹):
这个版本实现了把检测到的图片直接移动到新的文件夹而不是复制,也可以通过后面的加参数定义移动或者复制。
主要修改 shutil.copy2()为 shutil.move():
#!/usr/bin/env python3
"""
增强版人物图片检测程序(移动版本)
使用YOLOv8模型进行更准确的人物检测,并将图片移动到新文件夹
"""

import os
import shutil
import argparse
from pathlib import Path
import time

def setup_environment():
    """检查并导入所需的库"""
    try:
        from ultralytics import YOLO
        import cv2
        return YOLO, cv2
    except ImportError as e:
        print("错误: 缺少必要的库")
        print("请安装以下依赖:")
        print("pip install torch torchvision ultralytics opencv-python")
        print("\n如果安装缓慢,可以使用清华镜像:")
        print("pip install -i https://pypi.tuna.tsinghua.edu.cn/simple torch torchvision ultralytics opencv-python")
        return None, None

def extract_images_with_people_enhanced(source_dir, target_dir, confidence_threshold=0.3,
                                      model_size='yolov8n.pt', device='cpu',
                                      save_detection_preview=False, move_instead_of_copy=True):
    """
    使用YOLO模型检测并移动包含人物的图片

    参数:
    source_dir: 源文件夹路径
    target_dir: 目标文件夹路径
    confidence_threshold: 置信度阈值(0.0-1.0),值越小检测越敏感
    model_size: 模型大小 ('yolov8n.pt', 'yolov8s.pt', 'yolov8m.pt', 'yolov8l.pt', 'yolov8x.pt')
    device: 运行设备 ('cpu' 或 'cuda')
    save_detection_preview: 是否保存带检测框的预览图
    move_instead_of_copy: 是否移动而不是复制图片
    """

    # 检查库是否可用
    YOLO, cv2 = setup_environment()
    if YOLO is None:
        return

    # 创建目标文件夹
    Path(target_dir).mkdir(parents=True, exist_ok=True)

    # 如果启用预览,创建预览文件夹
    preview_dir = None
    if save_detection_preview:
        preview_dir = os.path.join(target_dir, "detection_previews")
        Path(preview_dir).mkdir(parents=True, exist_ok=True)

    # 支持的图片格式
    supported_formats = ['.jpg', '.jpeg', '.png', '.bmp', '.tiff', '.webp', '.JPG', '.JPEG', '.PNG']

    print("=" * 60)
    print("增强版人物图片检测程序(移动版本)")
    print("=" * 60)
    print(f"源文件夹: {source_dir}")
    print(f"目标文件夹: {target_dir}")
    print(f"操作模式: {'移动' if move_instead_of_copy else '复制'}")
    print(f"模型: {model_size}")
    print(f"置信度阈值: {confidence_threshold}")
    print(f"设备: {device}")
    print(f"保存检测预览: {save_detection_preview}")
    print("-" * 60)

    # 警告信息
    if move_instead_of_copy:
        print("⚠️  警告: 此操作将移动图片文件,原文件夹中的图片将被删除!")
        response = input("是否继续?(y/N): ")
        if response.lower() != 'y':
            print("操作已取消")
            return

    try:
        # 加载YOLO模型(会自动下载如果不存在)
        print("正在加载YOLO模型...")
        start_time = time.time()
        model = YOLO(model_size)
        load_time = time.time() - start_time
        print(f"✓ 模型加载完成,耗时: {load_time:.2f}秒")

    except Exception as e:
        print(f"✗ 模型加载失败: {e}")
        print("请检查网络连接或手动下载模型")
        return

    # 统计信息
    total_images = 0
    images_with_people = 0
    processed_files = []
    detection_times = []

    print("\n开始扫描图片...")

    # 获取所有图片文件
    image_files = []
    for filename in os.listdir(source_dir):
        file_path = os.path.join(source_dir, filename)
        if os.path.isfile(file_path) and any(filename.lower().endswith(fmt) for fmt in supported_formats):
            image_files.append(filename)

    total_files = len(image_files)
    print(f"找到 {total_files} 张待处理图片")

    # 处理每张图片
    for i, filename in enumerate(image_files, 1):
        file_path = os.path.join(source_dir, filename)

        print(f"\n[{i}/{total_files}] 处理: {filename}")
        total_images += 1

        try:
            # 记录开始时间
            start_time = time.time()

            # 使用YOLO进行检测
            results = model(file_path, conf=confidence_threshold, device=device, verbose=False)
            detection_time = time.time() - start_time
            detection_times.append(detection_time)

            # 检查是否检测到人物(YOLO中person类的ID是0)
            has_people = False
            people_count = 0
            max_confidence = 0.0

            for result in results:
                if result.boxes is not None and len(result.boxes) > 0:
                    for box in result.boxes:
                        class_id = int(box.cls)
                        confidence = float(box.conf)

                        # class_id 0 对应 'person'
                        if class_id == 0:
                            has_people = True
                            people_count += 1
                            max_confidence = max(max_confidence, confidence)

            if has_people:
                images_with_people += 1

                # 构建目标文件路径
                target_path = os.path.join(target_dir, filename)

                # 处理重名文件
                counter = 1
                base_target_path = target_path
                while os.path.exists(target_path):
                    name, ext = os.path.splitext(filename)
                    target_path = os.path.join(target_dir, f"{name}_{counter}{ext}")
                    counter += 1

                # 移动或复制文件到目标文件夹
                if move_instead_of_copy:
                    shutil.move(file_path, target_path)
                    operation_text = "移动"
                else:
                    shutil.copy2(file_path, target_path)
                    operation_text = "复制"

                # 如果启用预览,保存带检测框的图片
                if save_detection_preview and has_people:
                    try:
                        # 重新读取图片用于预览(如果是移动操作,需要重新加载)
                        if move_instead_of_copy:
                            preview_source_path = target_path
                        else:
                            preview_source_path = file_path

                        preview_results = model(preview_source_path, conf=confidence_threshold, device=device, verbose=False)
                        plotted_image = preview_results[0].plot()
                        preview_filename = f"preview_{os.path.splitext(filename)[0]}.jpg"
                        preview_path = os.path.join(preview_dir, preview_filename)
                        cv2.imwrite(preview_path, plotted_image)
                    except Exception as e:
                        print(f"  警告: 无法保存检测预览图: {e}")

                print(f"  ✓ 检测到 {people_count} 个人物 (最高置信度: {max_confidence:.3f})")
                print(f"  ✓ 检测时间: {detection_time:.2f}秒")
                print(f"  ✓ 已{operation_text}到: {os.path.basename(target_path)}")

                processed_files.append({
                    'filename': filename,
                    'people_count': people_count,
                    'max_confidence': max_confidence,
                    'detection_time': detection_time,
                    'operation': operation_text
                })

            else:
                print(f"  ✗ 未检测到人物 (检测时间: {detection_time:.2f}秒)")

        except Exception as e:
            print(f"  ✗ 处理图片时出错: {e}")
            continue

    # 输出统计信息
    print("\n" + "=" * 60)
    print("处理完成!")
    print("=" * 60)

    if total_images > 0:
        print(f"总共处理图片: {total_images}张")
        print(f"检测到包含人物的图片: {images_with_people}张")
        print(f"检测率: {(images_with_people/total_images*100):.1f}%")

        if detection_times:
            avg_detection_time = sum(detection_times) / len(detection_times)
            print(f"平均检测时间: {avg_detection_time:.2f}秒/张")
            print(f"总检测时间: {sum(detection_times):.2f}秒")

        if images_with_people > 0:
            operation_mode = "移动" if move_instead_of_copy else "复制"
            print(f"\n包含人物的图片已{operation_mode}到: {target_dir}")
            if save_detection_preview:
                print(f"检测预览图已保存到: {preview_dir}")

            # 显示检测到最多人物的前几张图片
            if processed_files:
                processed_files.sort(key=lambda x: x['people_count'], reverse=True)
                print(f"\n检测结果最好的图片:")
                for i, file_info in enumerate(processed_files[:3]):
                    print(f"  {i+1}. {file_info['filename']} - {file_info['people_count']}人 "
                          f"(置信度: {file_info['max_confidence']:.3f})")

            # 安全提示
            if move_instead_of_copy:
                remaining_files = len([f for f in os.listdir(source_dir)
                                     if any(f.lower().endswith(fmt) for fmt in supported_formats)])
                print(f"\n⚠️  原文件夹剩余图片: {remaining_files}张")
                print("⚠️  检测到的图片已被移动到目标文件夹,原文件已删除")
    else:
        print("未找到任何可处理的图片文件")

def main():
    """主函数"""
    parser = argparse.ArgumentParser(description='增强版人物图片检测程序(移动版本)')
    parser.add_argument('--source', '-s', default='.',
                       help='源文件夹路径 (默认: 当前文件夹)')
    parser.add_argument('--target', '-t', default='images_with_people',
                       help='目标文件夹路径 (默认: images_with_people)')
    parser.add_argument('--confidence', '-c', type=float, default=0.3,
                       help='检测置信度阈值 (0.0-1.0, 默认: 0.3)')
    parser.add_argument('--model', '-m', default='yolov8n.pt',
                       choices=['yolov8n.pt', 'yolov8s.pt', 'yolov8m.pt', 'yolov8l.pt', 'yolov8x.pt'],
                       help='YOLO模型大小 (默认: yolov8n.pt)')
    parser.add_argument('--device', '-d', default='cpu',
                       choices=['cpu', 'cuda'],
                       help='运行设备 (默认: cpu)')
    parser.add_argument('--preview', '-p', action='store_true',
                       help='保存带检测框的预览图')
    parser.add_argument('--copy', action='store_true',
                       help='使用复制模式而不是移动模式')

    args = parser.parse_args()

    # 检查源文件夹是否存在
    if not os.path.exists(args.source):
        print(f"错误: 源文件夹 '{args.source}' 不存在")
        return

    # 运行检测程序
    extract_images_with_people_enhanced(
        source_dir=args.source,
        target_dir=args.target,
        confidence_threshold=args.confidence,
        model_size=args.model,
        device=args.device,
        save_detection_preview=args.preview,
        move_instead_of_copy=not args.copy  # 如果指定--copy则使用复制模式
    )

# 简化版本函数(不需要命令行参数)
def simple_extract():
    """简化版本,使用默认参数(移动模式)"""
    source_dir = os.getcwd()  # 当前文件夹
    target_dir = os.path.join(source_dir, "images_with_people")

    print("使用简化模式运行(移动模式)...")
    print("此操作将把检测到人物的图片移动到新文件夹!")

    response = input("是否继续?(y/N): ")
    if response.lower() != 'y':
        print("操作已取消")
        return

    extract_images_with_people_enhanced(source_dir, target_dir, move_instead_of_copy=True)

if __name__ == "__main__":
    # 如果没有命令行参数,使用简化版本
    import sys
    if len(sys.argv) == 1:
        simple_extract()
    else:
        main()
主要修改内容:
将 shutil.copy2()改为 shutil.move() 添加了移动模式的安全确认 ,避免误操作增加了 move_instead_of_copy参数 ,可以控制是移动还是复制添加了 --copy命令行参数 ,如果需要复制模式可以加上这个参数改进了预览图生成逻辑 ,适应移动操作增加了操作完成后的统计信息 ,显示剩余文件数量
使用方法:
移动模式(默认):
# 简单使用(移动图片)
python extract_people_images_enhanced_move.py

# 带参数使用
python extract_people_images_enhanced_move.py --source ./图片文件夹 --target ./人物图片
复制模式(如果需要保留原文件):
# 使用复制模式
python extract_people_images_enhanced_move.py --copy

# 带预览的复制模式
python extract_people_images_enhanced_move.py --copy --preview
其他参数:
# 调整检测敏感度
python extract_people_images_enhanced_move.py --confidence 0.2

# 使用更大的模型
python extract_people_images_enhanced_move.py --model yolov8s.pt

# 保存检测预览图
python extract_people_images_enhanced_move.py --preview
安全特性:
运行前确认 :移动模式会要求用户确认进度显示 :实时显示处理进度结果统计 :完成后显示移动/复制的文件数量剩余文件提示 :显示原文件夹剩余图片数量
这样修改后,检测到人物的图片会被直接移动到目标文件夹,原文件会被删除,节省磁盘空间。如果你需要保留原文件,使用 --copy参数即可。
高级检测:
方案1:基于YOLO的人体部位检测
专门检测女性人体暴露或色情内容。这里有几个不同级别的实现方案:
#!/usr/bin/env python3
"""
女性人体暴露/色情图片检测程序
使用YOLO模型检测暴露的身体部位
"""
import os
import shutil
import argparse
from pathlib import Path
import time
def setup_environment():
"""检查并导入所需的库"""
try:
from ultralytics import YOLO
import cv2
return YOLO, cv2
except ImportError as e:
print("错误: 缺少必要的库")
print("请安装以下依赖:")
print("pip install torch torchvision ultralytics opencv-python")
return None, None
class NudityDetector:
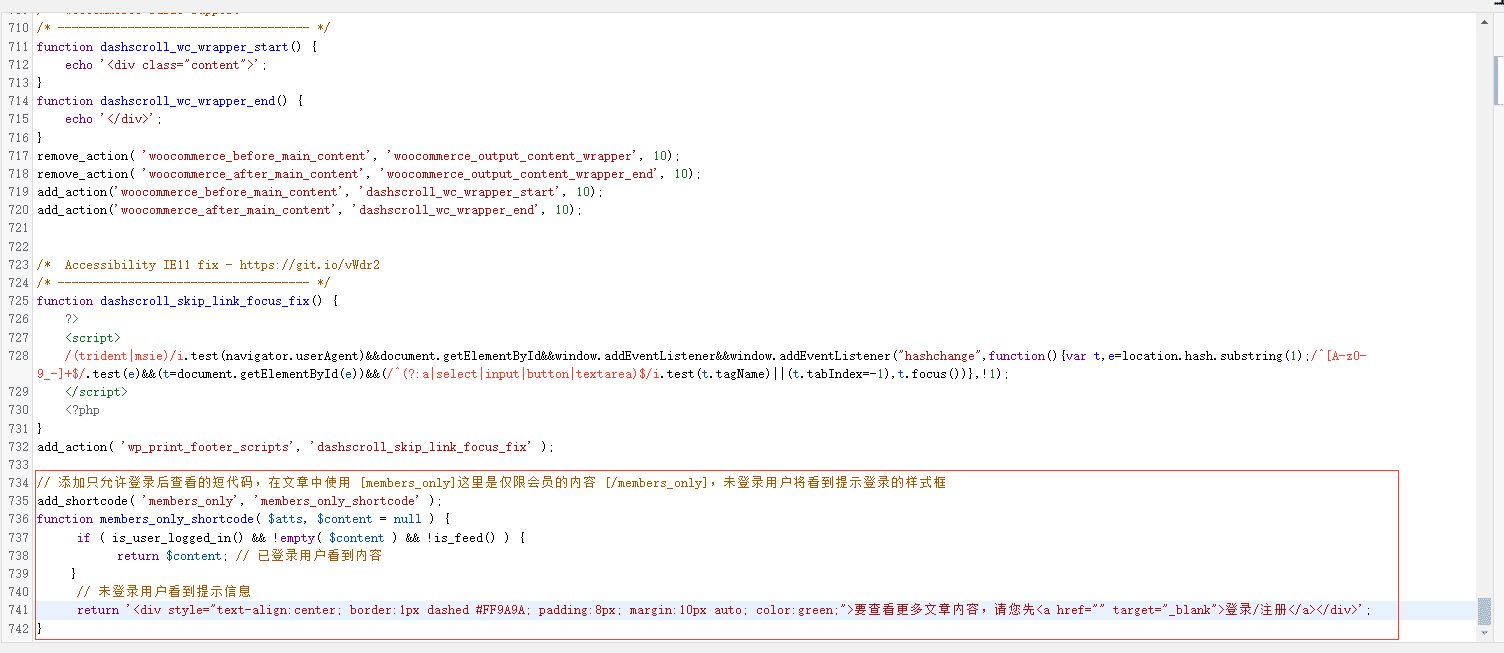
"""暴露内容检测器"""
def __init__(self, confidence_threshold=0.3):
self.confidence_threshold = confidence_threshold
# 定义敏感部位类别(基于COCO数据集)
self.sensitive_parts = {
'person': 0, # 人物
'face': 1, # 脸部(某些数据集有)
}
# 定义暴露风险等级的关键词(用于文件名和路径分析)
self.risky_keywords = [
'nude', 'naked', 'bikini', 'swimsuit', 'lingerie', 'sexy', 'hot',
'暴露', '性感', '内衣', '比基尼', '泳装', '裸体', '色情'
]
def detect_exposure_level(self, results, filename=""):
"""
检测图片的暴露等级
返回: (暴露等级, 置信度, 检测到的部位)
"""
exposure_level = 0 # 0: 安全, 1: 轻度, 2: 中度, 3: 高度暴露
max_confidence = 0
detected_parts = []
for result in results:
if result.boxes is not None and len(result.boxes) > 0:
for box in result.boxes:
class_id = int(box.cls)
confidence = float(box.conf)
# 检测人物
if class_id == 0: # person
detected_parts.append('person')
max_confidence = max(max_confidence, confidence)
# 如果有高置信度的人物检测,基础暴露等级为1
if confidence > 0.5:
exposure_level = max(exposure_level, 1)
# 基于文件名分析
filename_risk = self.analyze_filename_risk(filename.lower())
exposure_level = max(exposure_level, filename_risk)
return exposure_level, max_confidence, detected_parts
def analyze_filename_risk(self, filename):
"""分析文件名的风险等级"""
risk_level = 0
for keyword in self.risky_keywords:
if keyword in filename:
if keyword in ['nude', 'naked', '裸体', '色情']:
risk_level = max(risk_level, 3)
elif keyword in ['bikini', 'swimsuit', 'lingerie', '比基尼', '泳装', '内衣']:
risk_level = max(risk_level, 2)
else:
risk_level = max(risk_level, 1)
return risk_level
def analyze_skin_ratio(self, image_path):
"""简单的肤色比例分析(基础版本)"""
try:
import cv2
import numpy as np
# 读取图片
img = cv2.imread(image_path)
if img is None:
return 0
# 转换到HSV颜色空间进行肤色检测
hsv = cv2.cvtColor(img, cv2.COLOR_BGR2HSV)
# 定义肤色范围(需要根据实际情况调整)
lower_skin = np.array([0, 20, 70], dtype=np.uint8)
upper_skin = np.array([20, 255, 255], dtype=np.uint8)
# 创建肤色掩码
mask = cv2.inRange(hsv, lower_skin, upper_skin)
# 计算肤色像素比例
skin_ratio = np.sum(mask > 0) / (img.shape[0] * img.shape[1])
return skin_ratio
except Exception as e:
print(f"肤色分析错误: {e}")
return 0
def extract_sensitive_images(source_dir, target_dir, confidence_threshold=0.3,
model_size='yolov8n.pt', device='cpu',
save_detection_preview=False, move_instead_of_copy=True,
min_exposure_level=1):
"""
检测并提取敏感图片
参数:
source_dir: 源文件夹路径
target_dir: 目标文件夹路径
confidence_threshold: 置信度阈值
model_size: 模型大小
device: 运行设备
save_detection_preview: 是否保存检测预览
move_instead_of_copy: 是否移动文件
min_exposure_level: 最小暴露等级 (1-3)
"""
# 检查库是否可用
YOLO, cv2 = setup_environment()
if YOLO is None:
return
# 创建目标文件夹
Path(target_dir).mkdir(parents=True, exist_ok=True)
# 按暴露等级创建子文件夹
level_folders = {
1: os.path.join(target_dir, "level1_mild"),
2: os.path.join(target_dir, "level2_moderate"),
3: os.path.join(target_dir, "level3_high")
}
for folder in level_folders.values():
Path(folder).mkdir(parents=True, exist_ok=True)
# 如果启用预览,创建预览文件夹
preview_dir = None
if save_detection_preview:
preview_dir = os.path.join(target_dir, "detection_previews")
Path(preview_dir).mkdir(parents=True, exist_ok=True)
# 支持的图片格式
supported_formats = ['.jpg', '.jpeg', '.png', '.bmp', '.tiff', '.webp']
print("=" * 70)
print("女性人体暴露/色情图片检测程序")
print("=" * 70)
print(f"源文件夹: {source_dir}")
print(f"目标文件夹: {target_dir}")
print(f"操作模式: {'移动' if move_instead_of_copy else '复制'}")
print(f"最小暴露等级: {min_exposure_level}")
print(f"模型: {model_size}")
print(f"置信度阈值: {confidence_threshold}")
print("-" * 70)
# 警告信息
if move_instead_of_copy:
print("⚠️ 警告: 此操作将移动图片文件!")
response = input("是否继续?(y/N): ")
if response.lower() != 'y':
print("操作已取消")
return
# 初始化检测器
detector = NudityDetector(confidence_threshold)
try:
# 加载YOLO模型
print("正在加载YOLO模型...")
start_time = time.time()
model = YOLO(model_size)
load_time = time.time() - start_time
print(f"✓ 模型加载完成,耗时: {load_time:.2f}秒")
except Exception as e:
print(f"✗ 模型加载失败: {e}")
return
# 统计信息
total_images = 0
detected_images = 0
level_stats = {1: 0, 2: 0, 3: 0}
processed_files = []
detection_times = []
print("\n开始扫描图片...")
# 获取所有图片文件
image_files = []
for filename in os.listdir(source_dir):
file_path = os.path.join(source_dir, filename)
if os.path.isfile(file_path) and any(filename.lower().endswith(fmt) for fmt in supported_formats):
image_files.append(filename)
total_files = len(image_files)
print(f"找到 {total_files} 张待处理图片")
# 处理每张图片
for i, filename in enumerate(image_files, 1):
file_path = os.path.join(source_dir, filename)
print(f"\n[{i}/{total_files}] 分析: {filename}")
total_images += 1
try:
start_time = time.time()
# 使用YOLO进行检测
results = model(file_path, conf=confidence_threshold, device=device, verbose=False)
detection_time = time.time() - start_time
detection_times.append(detection_time)
# 检测暴露等级
exposure_level, max_confidence, detected_parts = detector.detect_exposure_level(results, filename)
# 简单的肤色比例分析
skin_ratio = detector.analyze_skin_ratio(file_path)
if skin_ratio > 0.3: # 如果肤色比例较高,提高暴露等级
exposure_level = max(exposure_level, 2)
if exposure_level >= min_exposure_level:
detected_images += 1
level_stats[exposure_level] = level_stats.get(exposure_level, 0) + 1
# 确定目标文件夹
target_level_folder = level_folders.get(exposure_level, target_dir)
# 构建目标文件路径
target_path = os.path.join(target_level_folder, filename)
# 处理重名文件
counter = 1
while os.path.exists(target_path):
name, ext = os.path.splitext(filename)
target_path = os.path.join(target_level_folder, f"{name}_{counter}{ext}")
counter += 1
# 移动或复制文件
if move_instead_of_copy:
shutil.move(file_path, target_path)
operation_text = "移动"
else:
shutil.copy2(file_path, target_path)
operation_text = "复制"
# 保存检测预览
if save_detection_preview:
try:
preview_results = model(target_path if move_instead_of_copy else file_path,
conf=confidence_threshold, device=device, verbose=False)
plotted_image = preview_results[0].plot()
preview_filename = f"L{exposure_level}_preview_{os.path.splitext(filename)[0]}.jpg"
preview_path = os.path.join(preview_dir, preview_filename)
cv2.imwrite(preview_path, plotted_image)
except Exception as e:
print(f" 警告: 无法保存检测预览图: {e}")
# 暴露等级描述
level_descriptions = {
1: "轻度暴露",
2: "中度暴露",
3: "高度暴露"
}
print(f" ✓ 检测结果: {level_descriptions.get(exposure_level, '未知')} (等级{exposure_level})")
print(f" ✓ 肤色比例: {skin_ratio:.3f}")
print(f" ✓ 检测部位: {', '.join(detected_parts) if detected_parts else '无'}")
print(f" ✓ 检测时间: {detection_time:.2f}秒")
print(f" ✓ 已{operation_text}到: level{exposure_level}/{os.path.basename(target_path)}")
processed_files.append({
'filename': filename,
'exposure_level': exposure_level,
'skin_ratio': skin_ratio,
'detected_parts': detected_parts,
'detection_time': detection_time,
'operation': operation_text
})
else:
print(f" ✗ 安全图片 (暴露等级: {exposure_level}, 检测时间: {detection_time:.2f}秒)")
except Exception as e:
print(f" ✗ 处理图片时出错: {e}")
continue
# 输出统计信息
print("\n" + "=" * 70)
print("检测完成!")
print("=" * 70)
if total_images > 0:
print(f"总共处理图片: {total_images}张")
print(f"检测到敏感图片: {detected_images}张")
print(f"检测率: {(detected_images/total_images*100):.1f}%")
print(f"\n暴露等级分布:")
for level, count in level_stats.items():
if count > 0:
level_desc = {1: "轻度暴露", 2: "中度暴露", 3: "高度暴露"}.get(level, "未知")
print(f" 等级{level} ({level_desc}): {count}张")
if detected_images > 0:
operation_mode = "移动" if move_instead_of_copy else "复制"
print(f"\n敏感图片已{operation_mode}到对应等级的文件夹")
# 显示检测结果
if processed_files:
processed_files.sort(key=lambda x: x['exposure_level'], reverse=True)
print(f"\n风险最高的图片:")
for i, file_info in enumerate(processed_files[:5]):
print(f" {i+1}. {file_info['filename']} - 等级{file_info['exposure_level']} "
f"(肤色比例: {file_info['skin_ratio']:.3f})")
else:
print("未找到任何可处理的图片文件")
def main():
"""主函数"""
parser = argparse.ArgumentParser(description='女性人体暴露/色情图片检测程序')
parser.add_argument('--source', '-s', default='.',
help='源文件夹路径 (默认: 当前文件夹)')
parser.add_argument('--target', '-t', default='sensitive_images',
help='目标文件夹路径 (默认: sensitive_images)')
parser.add_argument('--confidence', '-c', type=float, default=0.3,
help='检测置信度阈值 (0.0-1.0, 默认: 0.3)')
parser.add_argument('--model', '-m', default='yolov8n.pt',
choices=['yolov8n.pt', 'yolov8s.pt', 'yolov8m.pt', 'yolov8l.pt', 'yolov8x.pt'],
help='YOLO模型大小 (默认: yolov8n.pt)')
parser.add_argument('--device', '-d', default='cpu',
choices=['cpu', 'cuda'],
help='运行设备 (默认: cpu)')
parser.add_argument('--preview', '-p', action='store_true',
help='保存带检测框的预览图')
parser.add_argument('--copy', action='store_true',
help='使用复制模式而不是移动模式')
parser.add_argument('--level', type=int, default=1, choices=[1, 2, 3],
help='最小暴露等级 (1:轻度, 2:中度, 3:高度, 默认: 1)')
args = parser.parse_args()
if not os.path.exists(args.source):
print(f"错误: 源文件夹 '{args.source}' 不存在")
return
extract_sensitive_images(
source_dir=args.source,
target_dir=args.target,
confidence_threshold=args.confidence,
model_size=args.model,
device=args.device,
save_detection_preview=args.preview,
move_instead_of_copy=not args.copy,
min_exposure_level=args.level
)
if __name__ == "__main__":
import sys
if len(sys.argv) == 1:
# 简化模式运行
source_dir = os.getcwd()
target_dir = os.path.join(source_dir, "sensitive_images")
print("女性人体暴露图片检测程序")
print("此操作将检测并分类暴露程度的图片!")
response = input("是否继续?(y/N): ")
if response.lower() == 'y':
extract_sensitive_images(source_dir, target_dir, move_instead_of_copy=True)
else:
print("操作已取消")
else:
main()
方案2:使用专门的NSFW检测模型
如果需要更准确的结果,可以使用专门的NSFW检测模型:
# 需要额外安装的库
# pip install tensorflow keras

def setup_nsfw_detector():
    """设置专门的NSFW检测器"""
    try:
        # 这里可以使用预训练的NSFW检测模型
        # 例如: https://github.com/rockyzhengwu/nsfw
        print("正在加载NSFW检测模型...")
        # 实际实现需要下载预训练模型
        return None
    except ImportError:
        print("请安装TensorFlow: pip install tensorflow")
        return None
使用方法:
# 基本使用(移动模式,检测所有暴露等级)
python sensitive_detector.py

# 只检测高度暴露的图片
python sensitive_detector.py --level 3

# 复制模式(保留原文件)
python sensitive_detector.py --copy

# 指定源文件夹和目标文件夹
python sensitive_detector.py --source ./图片库 --target ./敏感图片

# 保存检测预览
python sensitive_detector.py --preview

# 使用更准确的模型
python sensitive_detector.py --model yolov8s.pt
暴露等级说明:
等级1(轻度) : 检测到人物,可能有轻微暴露等级2(中度) : 检测到较多肤色区域或敏感关键词等级3(高度) : 高度暴露内容,包含大量肤色区域或明确敏感内容
注意事项:
准确率限制 : 这种检测方法有一定误判率隐私保护 : 请确保合法使用,尊重他人隐私法律合规 : 在不同地区使用此类工具可能受到法律限制人工审核 : 建议最终结果由人工审核确认
这个程序会按暴露程度将图片分类到不同的文件夹,方便你进一步处理。
正确的运行方法:
方法1:直接运行Python脚本
# 进入脚本所在目录
cd /home/leepoet/Documents/env/myenv/甜心

# 直接运行Python脚本
python 女性人体暴露.py
方法2:给脚本添加执行权限后直接运行
# 进入脚本所在目录
cd /home/leepoet/Documents/env/myenv/甜心

# 给脚本添加执行权限
chmod +x 女性人体暴露.py

# 直接运行脚本
./女性人体暴露.py
设置自定义检测路径
你可以通过命令行参数灵活指定源文件夹和目标文件夹:
# 检测指定文件夹,结果保存到自定义目录 # 完整参数示例 4. 关键参数说明
--source: 指定需要检测的图片文件夹路径--target: 指定结果输出文件夹路径--confidence: 调整检测灵敏度(0.1-1.0)--model: 选择不同的YOLO模型(影响精度和速度)--preview: 保存带检测框的预览图--copy: 使用复制模式(默认是移动文件)